
Upgrading from Windows 7 to Windows 11 can sound like a daunting leap, especially with all the warnings about tight hardware requirements and data loss. Still, what if I told you that over 50 percent of Windows 7 PCs fail the Windows 11 compatibility check because of missing TPM 2.0 or outdated CPUs? Here is the surprise. You do not have to give up on your old machine just yet. With some preparation and the right steps, that aging computer might be more upgrade-ready than you expect.
Quick Summary
| Takeaway | Explanation |
|---|---|
| Check system requirements for Windows 11 | Ensure your device meets hardware criteria like TPM 2.0 and CPU specifications before upgrading. |
| Backup important files before upgrading | Safeguard data like documents and media using cloud or external storage to avoid potential loss during the upgrade process. |
| Follow a step-by-step upgrade guide | Utilize official methods like the Installation Assistant for a structured approach to ensure a successful transition to Windows 11. |
| Address performance issues post-upgrade | If you encounter slowness or software compatibility problems, update drivers, and optimize system settings to improve performance. |
| Utilize troubleshooting techniques | For persistent issues after upgrading, consider system restore or seeking Microsoft Support for resolution of advanced technical problems. |
Check If Your Device Meets Windows 11 Requirements
Before upgrading from Windows 7 to Windows 11, you must verify your computer meets the necessary system requirements. Many users find themselves unexpectedly blocked from upgrading due to hardware limitations. Learn about system compatibility to ensure a smooth transition.
Understanding Windows 11 Hardware Requirements
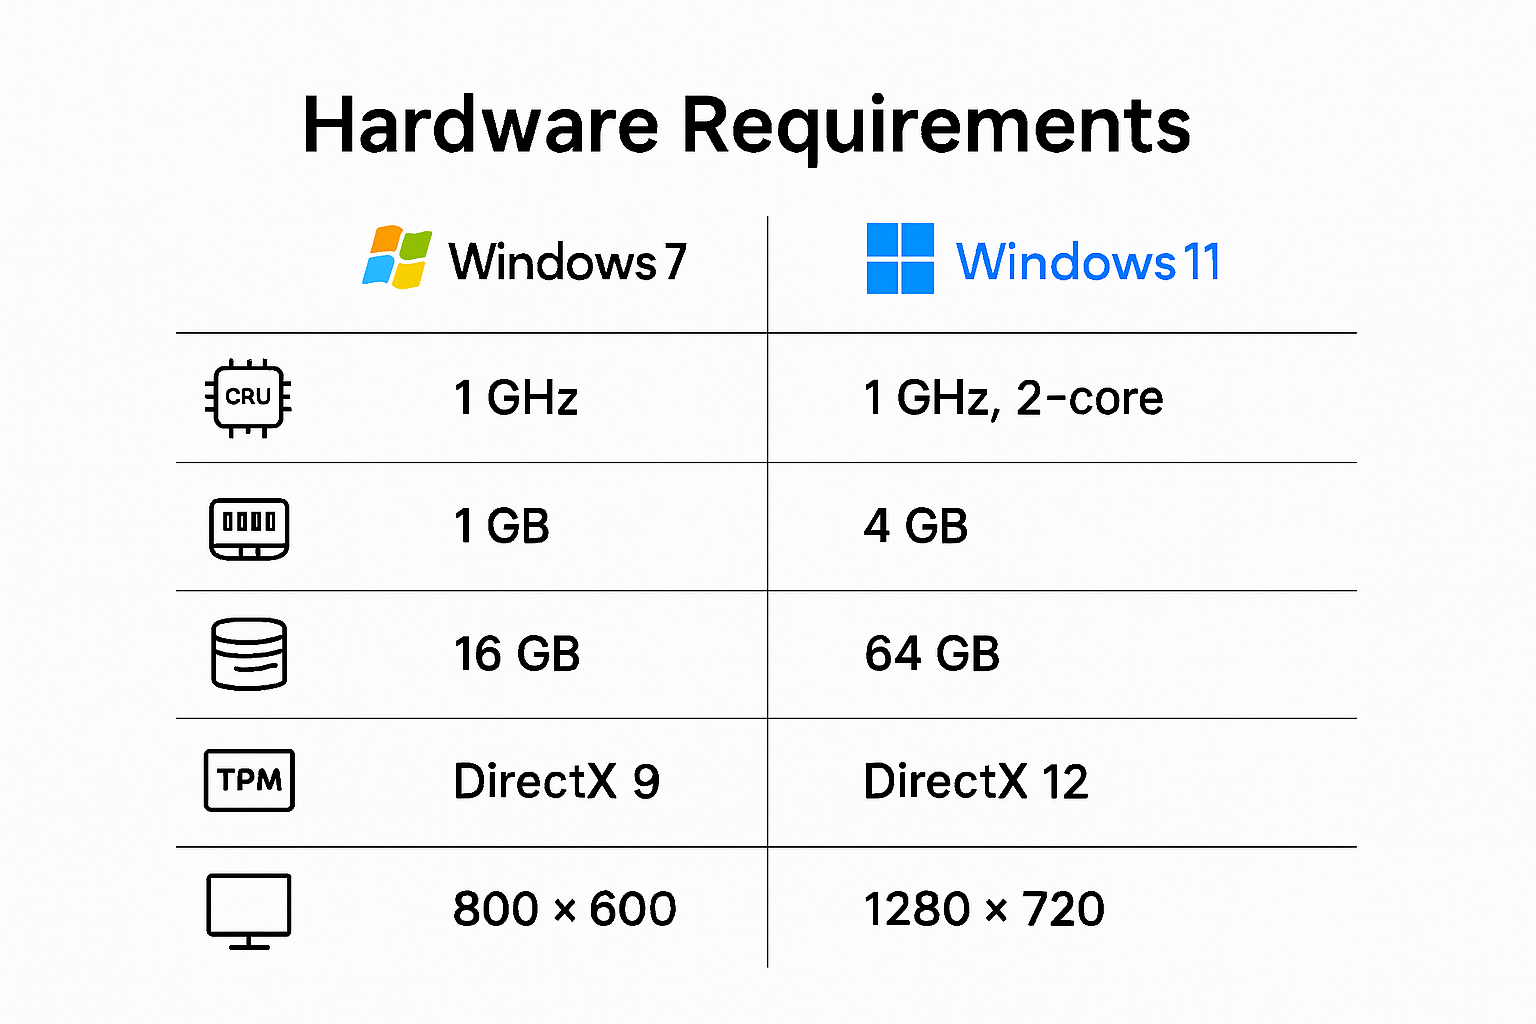
Windows 11 introduces more stringent hardware specifications compared to previous Windows versions. According to Microsoft’s official system requirements, your device must meet several critical criteria:
- Processor: Requires a 1 GHz processor with 2 or more cores
- RAM: Minimum 4 GB of memory
- Storage: At least 64 GB of available storage
- System Firmware: UEFI firmware with Secure Boot capability
- TPM: Trusted Platform Module (TPM) version 2.0
- Graphics: DirectX 12 compatible graphics card
- Display: High-definition display with at least 720p resolution
These requirements represent a significant upgrade from Windows 7’s more lenient hardware specifications. Not every older computer will automatically qualify for the Windows 11 upgrade.
Checking Device Compatibility
To determine whether your Windows 7 machine can handle Windows 11, Microsoft provides several diagnostic tools. The PC Health Check app offers a straightforward method to assess your system’s readiness. This tool performs a comprehensive scan of your hardware and highlights any potential compatibility issues.
If your current device falls short of the requirements, you might need to consider hardware upgrades or purchasing a new computer. Some key components like the processor and TPM cannot be easily retrofitted on older machines. Pay special attention to the TPM 2.0 requirement, which many older computers lack.
For users with compatible hardware, the upgrade process becomes much more straightforward. Ensuring your device meets these specifications beforehand can save significant time and frustration during the Windows 11 migration process. Careful preparation and understanding of these technical requirements will help you navigate the upgrade successfully.
Prepare Your System for a Hassle-Free Upgrade
Transitioning from Windows 7 to Windows 11 requires careful preparation to ensure a smooth and successful upgrade experience. Explore our upgrade preparation tips to minimize potential complications during the process.
Backup Your Critical Data
Before initiating any system upgrade, creating a comprehensive backup is paramount. According to Stanford University’s IT department, backing up your data protects against potential loss during the migration process. Use external hard drives, cloud storage services, or dedicated backup software to safeguard:
- Personal documents
- Photos and media files
- Important work files
- Browser bookmarks and saved passwords
- Email archives
Consider using multiple backup methods to ensure redundancy. Windows 7 users should pay special attention to data preservation, as the upgrade process can be more complex compared to more recent Windows versions.

System Optimization and Cleanup
Preparing your system involves more than just backing up data. According to Microsoft’s official upgrade guidelines, system optimization is crucial for a successful upgrade. Start by:
- Uninstalling unnecessary applications
- Clearing temporary files and system cache
- Running disk cleanup utilities
- Defragmenting your hard drive
- Updating existing Windows 7 system to the latest service pack
These steps help streamline your system, reduce potential upgrade conflicts, and improve overall performance during the transition to Windows 11.
Final Pre-Upgrade Checklist
Before clicking the upgrade button, complete a final preparation checklist. Ensure you have:
- Stable internet connection
- Sufficient storage space (minimum 64 GB free)
- Connected to a reliable power source
- All critical software and drivers updated
- Documented software licenses and product keys
- Completed a full system backup
Taking these meticulous preparation steps significantly increases the likelihood of a successful Windows 7 to Windows 11 upgrade. Patient and thorough preparation transforms what could be a complex process into a manageable, smooth transition.
Step-by-Step Guide to Upgrade Windows 7 to 11
Upgrading from Windows 7 to Windows 11 requires a methodical approach to ensure a successful transition. Navigate the upgrade process smoothly by following these comprehensive instructions carefully.
Verify Final Compatibility and Preparations
Before beginning the upgrade, conduct a final compatibility check. According to Microsoft’s official installation guide, you have multiple upgrade paths. First, confirm your device meets all Windows 11 system requirements. Since Windows 7 is significantly older, most users will need to manually download the Windows 11 Installation Assistant or create installation media.
Ensure you have:
- A valid Windows 11 product key
- Minimum 64 GB storage space
- Stable internet connection
- Backup of all critical data
- Administrative access to your current Windows 7 system
Windows 11 Installation Methods
Microsoft offers several approaches for upgrading your operating system. Windows 11 Installation Assistant provides three primary methods:
- Windows Update Upgrade
- Check Windows Update settings
- Look for available Windows 11 upgrade
- Follow on-screen instructions
- Requires meeting all system requirements
- Installation Assistant Download
- Visit Microsoft’s official website
- Download Windows 11 Installation Assistant
- Run the tool
- Follow step-by-step prompts
- Recommended for most users
- Create Installation Media
- Download Microsoft’s Media Creation Tool
- Generate a bootable USB drive
- Perform clean installation
- Most complex but offers most control
Here’s a comparison table to help you understand the features of each Windows 11 installation method and choose the best approach for your upgrade.
| Installation Method | Ease of Use | Requirements | Clean Install Option | Who Should Use |
|---|---|---|---|---|
| Windows Update Upgrade | Easiest | Full compatibility | No | Fully compatible PCs |
| Installation Assistant | Moderate | Win 7/8/10, Internet | No | Most users |
| Create Installation Media | Advanced | USB drive, ISO, bootable | Yes | Advanced users |
Post-Installation Configuration
After successfully installing Windows 11, complete several critical post-installation steps. Microsoft Learn recommends configuring system settings, updating drivers, and verifying software compatibility.
Key post-installation tasks include:
- Update all device drivers
- Configure Windows security settings
- Reinstall essential software
- Verify hardware functionality
- Transfer saved files and settings
While upgrading from Windows 7 to Windows 11 might seem challenging, following these structured steps minimizes potential complications. Patient, methodical execution ensures a smooth transition to your new operating system. Remember that some older hardware may require additional troubleshooting or potential hardware upgrades to fully support Windows 11’s advanced features.
Fix Common Issues After Upgrading to Windows 11
After upgrading from Windows 7 to Windows 11, users might encounter various technical challenges that can disrupt their computing experience. Discover troubleshooting solutions to address potential post-upgrade complications effectively.
Performance and Compatibility Challenges
Transitioning to Windows 11 can introduce unexpected performance issues. According to Microsoft’s community discussions, many users report system slowdowns and application compatibility problems. Common performance challenges include:
- Unexpected system freezes
- Slower application launch times
- Compatibility issues with older software
- Driver conflicts with hardware components
- Reduced overall system responsiveness
To mitigate these challenges, update all device drivers, uninstall incompatible applications, and ensure your hardware meets Windows 11 minimum specifications. Windows 7 users might experience more pronounced compatibility issues due to the significant technological gap between the two operating systems.
Resolving System Update and Network Problems
Network connectivity and system update issues frequently emerge after upgrading. Microsoft’s official documentation highlights several common problems users might encounter:
- Wi-Fi connection instability
- Windows Update getting stuck
- Bluetooth device disconnection
- Intermittent internet connectivity
- Windows Update failing to install
The following table summarizes these common post-upgrade issues and provides suggested troubleshooting actions to help resolve them efficiently.
| Issue | Common Symptoms | Recommended Solution |
|---|---|---|
| Wi-Fi connection instability | Dropped/slow connections | Reset adapter, update network drivers |
| Windows Update getting stuck | Updates freeze, won’t progress | Clear update cache, restart PC |
| Bluetooth device disconnection | Devices disconnect, won’t pair | Reinstall Bluetooth drivers |
| Intermittent internet | On/off connectivity, slow speeds | Run Network Troubleshooter, reboot |
| Windows Update failing to install | Error messages, repeated failures | Run update troubleshooter, clean boot |
Troubleshooting steps include resetting network adapters, clearing Windows Update cache, and performing a clean boot to isolate potential conflicts. For persistent network issues, consider reinstalling network drivers or using the Windows Network Troubleshooter.
Advanced Troubleshooting Techniques
When standard troubleshooting methods fail, more advanced techniques can help resolve complex post-upgrade issues. Recommended strategies include:
- System Restore: Revert to a previous system configuration
- Performing a clean Windows 11 installation
- Running comprehensive system diagnostics
- Checking and resolving hardware compatibility issues
- Consulting Microsoft Support for specific technical challenges
Remember that transitioning from Windows 7 to Windows 11 represents a significant technological leap. Patience and methodical troubleshooting are key to successfully navigating potential complications. While challenges may arise, most issues can be resolved with careful attention and the right technical approach.
Frequently Asked Questions
How can I check if my Windows 7 PC is compatible with Windows 11?
To check if your Windows 7 PC is compatible with Windows 11, download and use the PC Health Check app from Microsoft’s official website. It will identify if your device meets the required hardware specifications.
What are the minimum hardware requirements to upgrade from Windows 7 to Windows 11?
The minimum hardware requirements for Windows 11 include a 1 GHz processor with 2 or more cores, at least 4 GB of RAM, 64 GB of storage, UEFI firmware with Secure Boot, TPM version 2.0, and a DirectX 12 compatible graphics card.
Should I backup my data before upgrading to Windows 11?
Yes, you should always backup your data before upgrading to avoid potential loss. Use cloud storage or external drives to safeguard important files such as documents, media, and settings.
What should I do if I encounter issues after upgrading to Windows 11?
If you face issues after upgrading, try updating your drivers, uninstalling incompatible applications, and using the Windows troubleshooter. For persistent problems, consider performing a system restore or consulting Microsoft Support.
Secure Your Windows 11 Upgrade with Genuine Product Keys
Worried about system compatibility checks and losing access to your device during your Windows 7 to Windows 11 upgrade? You are not alone. Many readers face hurdles like activation errors, installation failures, or worries about unsafe license sellers when moving to the newest Windows version. The article above highlights how unmet requirements and missing product keys can halt your progress—and how important it is to have both a compatible device and a valid license.

Why risk repeating the upgrade process or facing data loss due to invalid keys? At Logkeys.com, you are guaranteed 100 percent genuine Windows product keys verified for Windows 10 and Windows 11. Enjoy instant delivery and 24/7 support, so you never feel stuck during or after your upgrade. Ready for a smooth transition to Windows 11? Visit Logkeys.com to get your new license and see how our secure and affordable activation solutions can take the stress out of your upgrade. Act now and join thousands who upgraded with confidence and peace of mind.